
This article was written by Richard Presley, photographer for Attack The Back
I first got into jiu-jitsu and fight photography because I was inspired by documenters such as William Burkhart (@BJJPix) and Hywel Teague (FloGrappling).
They conveyed jiu-jitsu as an elegant, aggressive and dynamic sport and showed the world arte suave as it had never been seen before.

Getting Started
Beginning your journey with jiu-jitsu photography is relatively easy. As the world of mobile photography grows, so does the quality of the cameras, which means you can take some decent snaps of your training partners in your gym with just your phone.
The problem with the camera on your phone is the focal length. While it’s great for quick snaps within a few meters from you, when you’re standing in the bleachers the fighters are going to look like dots.
Camera
To get more control over your pictures you’re going to want to invest in a Digital SLR camera. A beginner’s DSLR kit will set you back a few hundred dollars.
While the price ranges can significantly increase, as a beginner you don’t need to invest in much. This DSLR from Nikon is the perfect starting point for most budding bjj photographers.
The Exposure Triangle
Now you have your first DSLR it’s time to study the manual. If you want to capture images you need to be concentrating on the action, not on your settings, so it's best to get those out of the way first. Next you’re going to want to work on the technical aspects of exposure. A perfectly exposed picture consists of three things:
Next you’re going to want to work on the technical aspects of exposure. A perfectly exposed picture consists of three things:
1. Aperture
Aperture refers to how much light your lens can allow onto your camera sensor. Your aperture is controlled entirely by your lens.
Many different lenses will come in different f-stops. If you look at your lens you’ll see f3.6-f5.6 printed on it, this means if you had a, 18-55mm kit lens at 18mm your lens would have a maximum aperture of f3.6 while at the 55mm end, it would go down to f5.6. You can get lenses go as low as f1.2 but they are normally fixed focal (prime) lenses and can get really expensive. A low F-Stop will allow more light and create a shallow depth of field, while a high F-Stop will allow in less light but create a deeper depth of field and sharper picture.
A low F-Stop will allow more light and create a shallow depth of field, while a high F-Stop will allow in less light but create a deeper depth of field and sharper picture.
2. Shutter Speed
This is how fast the shutter in your camera will snap closed. Understanding the shutter speed can be a little bit confusing at first but it’s easy enough to get your head around. A shutter speed of 1/8000 means your shutter speed will open and close in 8000
A shutter speed of 1/8000 means your shutter speed will open and close in 8000th of a second, while a shutter speed of 15” will hold the shutter open for 15 seconds before closing. Each has their advantage and each will bring in different amounts of light, the fast shutter speed will bring in less light than the long shutter speed. Combining shutter speed an aperture allows you to control the amount of light that hits the sensor.
Fast and slow shutter speeds each have their advantages. Each will bring in different amounts of light - the fast shutter speed will bring in less light than the long shutter speed. Combining shutter speed and aperture gives you great control over the amount of light that hits the sensor.
3. ISO
ISO (International Standards Organisation) is a standardized industry scale measuring sensitivity to light. The higher the ISO, the more sensitive to light your camera sensor is, allowing you to modify your shutter speed an aperture to get the perfect exposure. However, with high ISO comes more noise and grain. Pro-level cameras can manage sensor noise better than entry level.
However, with high ISO comes more noise and grain. Pro-level cameras can manage sensor noise better than entry level.
Getting the perfect exposure is a balancing act between your aperture, shutter speed and ISO.
Exposure meter
Your exposure meter is shown through your viewfinder as a dashed line with a beginning middle and end. While you move your camera around you’ll see it moving dependent on changes in light of the environment. This indicates your exposure. A line leaning towards the left means your picture is underexposed a line to the right means overexposed. Try to get it somewhere in the middle.
Getting your first pictures

Now that you have an idea on how to expose your pictures properly you can start thinking about the specifics details of jiu jitsu photography. Let's go through a few.
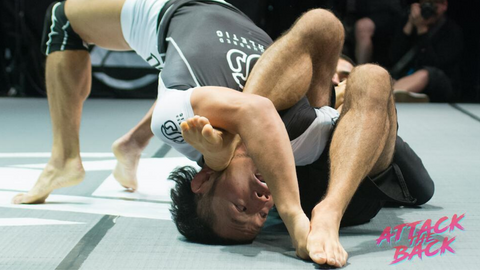
Motion
Jiu-Jitsu is a dynamic sport, with long periods of little movement followed by quick scrambles and dynamic guard passes. You’re going to want to capture the best of both worlds without having to change your settings too often.
Ideally, you will want to have a shutter speed of 1/250 to freeze the action but I would recommend 1/320 or higher. Obviously the faster your shutter speed the less light it will let in, so that needs to be balanced with a lens with a fast aperture (f2.8 or lower) and an iso without too much grain (ISO 1250 max).
Framing
You want to try and fill your frame with the fighters (this is where a long focal length can come in handy). The less negative space there is the more you can engage your viewers with the action.
Level
Get low to the ground and try and shoot from the ground up, that will give a different perspective on a fight that most people look down at.
White Balance
When you’re shooting you ideally want to get skin tones as natural as possible. This can be achieved by choosing your white balance. You can also change your white balance for artistic effect.
Art & Story
While it’s relatively simple to achieve a perfectly exposed photograph. It’s far more difficult to take a photograph that’s compelling and tells a story. You want to try and get a mixture of action, coaches and crowd, especially at events. Practice makes perfect when it comes to photography and if you keep practising you’ll be on the sidelines shooting all the events you want to.
Tips from the Pros
I asked some of the world’s best jiu-jitsu photographers what mistakes have they made and what tips would they give beginners. Here’s what they had to say:
"The first mistake I guess would be worrying too much about what everyone else is doing, their look, style etc. The second, I decided I'm doing this for me and because I love the sport and the community. I started to find my own look so to speak."
Luke Jarvis – Polaris Photographer
"Don't give up, it took me years of shooting amateur fights and small jiu-jitsu tournaments not getting paid to build up a reputation. Just keep at it and also don't be afraid to look for inspiration from other styles of photography just because it's mma or jiu-jitsu doesn't mean you shouldn't look to fashion for inspiration."
Dave Fogarty – Conor McGregor’s official photographer
"I would say my one tip would be to prioritize and to be selfish. You can’t shoot everyone and you have to remember that you compete too. Shooting all day is exhausting. You are at a severe disadvantage if you’re tired from shooting and then you go compete. So plan accordingly and make sure you give yourself enough time to rest and prep before your own fights."
AJ Barcelona – Freelance and IBJJF Photographer
"I guess that if you are willing to take pictures of BJJ, MMA or any other fighting/martial arts it’s because you love the sport, if not... I would highly recommend you quit RIGHT NOW and find something you love and feel passionate about to take pictures of. I honestly think that this is the most important thing to start with. Find whatever you love about the sport and show it to the world.
Secondly: Send your own message - don’t try to copy anyone else‘s because it won’t last for too long. Dare to ask questions, take your camera to your training sessions and as many tournaments as you can get a pass to. And be patient, this is a lot of very hard work, I can spend a whole month editing pictures of just one tournament, daily, for hours and hours. Apart from that, let your inspiration guide you, learn as much as you can and enjoy the trip."
Maggie Left – IBJJF Photographer
"My main piece of advice would be to get immersed in the sport/martial art. If you want to photograph jiu-jitsu go and train and compete. The more you understand the sport the better photographs you'll take.
The second piece of advice would be to try and photograph the things people don't normally get to see, everyone loves a flashy action shot during the fight but I think the shots that people really notice and remember are the ones that happen just after the fight or backstage. You need to try and capture a certain emotion or feeling."
Joshua Halvatzis – Live.co & BJJ Daily


0 comments